Recipe ideas, hints and tips, and general musings........


Recipe ideas, hints and tips, and general musings........

Welcome to 'Diamonds & Dauphinoise'.....a new blog for all you super busy, glamourous, girls about town and yummy mummies alike....who are real foodie floozies at heart, and love to feed and entertain their family and friends, but perhaps don't always have the time or energy to think of ideas!

My aim is to help inspire you all, and reduce the flurry of panic and stress of rushing around your kitchens in your Louboutins...

Get your your partner, your friends and your kids involved. If your kitchen is large enough, why should you be slaving away on your own? The kitchen is the heart of the home, it should be buzzy, vibrant, and happy....just as the dishes that are coming out of it.

If you would like to contact me please feel free to drop me an email: helenmorrisonkitchen@gmail.com

Remember the MOST important ingredient of any meal is LOVE...

I do hope you like my blog... x o x o

Wednesday 20 July 2011

Bread Sauce

You can’t get a more English accompaniment to a roast fowl than bread sauce.  I suppose in the old days it was a way of making the chicken, turkey or goose going a little further.

My dear friend Latifa was staying with us, and on her last day in wet dreary London before she flew off to Hong Kong, I thought I’d cook a traditional Sunday roast…chicken, potatoes roasted in goose fat, cabbage with pancetta and of course bread sauce.

I first cooked bread sauce for Latifa one Christmas and she absolutely loved it.

I always remember helping my father cook the Sunday lunch, and one of my jobs was bread sauce.  I really cannot stress how super easy this is to make, and really is a welcome addition to any Sunday lunch table.

Here’s what you need for lunch for 6:

Fresh breadcrumbs – white or brown, whatever you happen to have
Half an onion
Handful of whole cloves
2 or 3 bay leaves
Handful of whole black peppercorns
Pinch of mace
1 pint milk

Here’s what to do:

Stud half an onion with the whole cloves

Pour milk into saucepan

Add bay leaves, peppercorns and mace

Cover and bring the milk to the boil, and then take the saucepan off the heat, keeping the lid on so that all the flavours infuse into the milk.

Put the bread into a food processor and whizz into breadcrumbs, this will take no more than 10 seconds.

Towards the end of the preparation of your roast, the bread sauce is one of the last things you will need to do.

Remove the onion, peppercorns, bay and mace from the milk.  Add the breadcrumbs and stir in, and pop over a low heat to warm through, et voila…it is ready to serve with your glorious roast chicken….and of course with love…xoxo….

Sunday 17 July 2011

Salmon Terriyaki & spring onions

This dish is super speedy and only takes as long as the rice takes to cook.  In order for this to be super speedy, I use shop bought Teriyaki sauce – luckily for me I have an Asian supermarket round the corner from me, and I would recommend that you use the best quality Teriyaki sauce that you can find.

Teriyaki chicken, salmon or beef are all firm favourites in my household.  I like to serve with steamed rice, greens and deep fried julienne spring onions.  The reason for the deep fried spring onions is to add another texture dimension.

For 2 people, you will need:-

2 salmon fillets, skin on
5 spring onions
½ a cup of rice
Good quality shop bought Teriyaki sauce
Fresh spinach
Vegetable oil
Sesame oil
Soy sauce

Marinade the salmon fillets in the sauce.

Put the rice on – remember whatever quantity of rice you use, you’ll need double the amount of water.  So for 1 cup of rice, you’ll need 2 cups of water.  Just make sure you use the same cup both times.  Remember to add a good pinch of salt to pot, cover, bring to the boil, and turn the gas down to low and simmer very gently until all the water has evaporated, and the rice is cooked.  This should only take around 20 minutes.

The salmon only takes 5 minutes to pan fry, and the spring onions take even less.

Heat a wok or non-stick frying pan, and add a few drops of sesame oil.

Heat a small pot of vegetable oil until hot enough to deep fry.

Take off excess sauce of the salmon fillets, and place in the pan, skin side down.

Julienne the spring onions – this means to cut into very thin strips – and plunge into the hot oil for about 10 seconds.  Then remove and drain on kitchen paper.  We want the onions to be crispy, but still retain their vibrant green colour.

When you can start to see the sides of the salmon turn opaque then you know it’s time to turn the fish.  Flip over and turn off the heat.  Spoon over a couple of tablespoons of the teriyaki sauce and leave to settle and warm up.

Stir fry the spinach in a few drops of sesame oil until soft and wilted.

Now you’re ready to plate up.  Start with rice, then spinach, then salmon then top with the deep fried spring onions.

Serve with love……xoxo

Wednesday 8 June 2011

Koffmann's at The Berkeley


Last week, Alex and I celebrated our 3rd anniversary.  We have actually known one another for almost 9 years, however, we only got together in May 2009…. it just goes to show, that finding love, is all about being in the right place at the right time.

Alex and I are lucky enough to eat out often, but when it comes to special occasions, we always like to go somewhere new, and somewhere special.

A dear friend of mine Latifa, recently took her husband to Koffmann’s at the Berkeley Hotel, in Knightsbridge, London.  They came back with rave reviews, and I’ve been looking forward to going to Koffmann’s with Alex ever since.
Culinary legend Chef Pierre Koffmann did not fail to impress.  Alex and I were lucky enough to have eaten at the restaurant when Mr Koffmann was there.  Apparently he is there most days for both lunch and dinner service. We loved loved loved this restaurant.  It has jumped right up to the top of our favourites list!  It was classic, chic and unpretentious.  The food speaks for itself, and holds its own.
Pierre Koffmann
The décor was a mix of elegant Knightsbridge coiffing, together with rustic elements such fresh pot plants.  The staff were very friendly, approachable, and attentive without being intrusive.
Alex started with the delicious lobster ravioli, followed by a simply perfect pan fried Dover sole, and finished with a light fluffy pistachio soufflé. 

I had the silky, serene terrine of foie gras with homemade chutney, and toasted brioche, followed by the mighty lobster thermidor, and finished with the most heavenly a tarte au citron I have ever, ever tasted.

We washed this all down with a glorious Mersault ‘Les Vireuils’, Domaine Dupont – Fahn 2007.

This meal was perfect and memorable…and is vying for first place with dinner at The Waterside Inn, Bray - which is where Alex proposed to be me on bended knee….

To all at Koffmann’s keep up the good work – Alex and I are looking forward to coming back very soon!


Have a good day everyone…
…keep cooking with love…xoxo…


Monday 6 June 2011

New Season Asparagus & Soft Boiled Eggs

I adore asparagus and love it when it comes in season at the beginning of the summer.

I like asparagus to be kept simple, either dressed with a simple French dressing, or even just melted butter and a good grinding of pepper.  Tonight, however, I fancied having asparagus with eggs.

Now I must admit I am not the best at making poached eggs, so I decided to softly boil some eggs instead.

Here’s what you need:-

1 bunch of asparagus ends trimmed if necessary
3 large organic, free range Columbian Black Tailed eggs

Bring a large pan of salted water to the boil.

Add the eggs for 2 minutes
Drop in the asparagus and cook all together for a further 4 minutes
Remove the boiled eggs from the water and take off the shells
Drain the asparagus

Now assemble it on the plate:-

Asparagus first
Drizzle over your best extra virgin olive oil
Season with Malden sea salt and freshly milled black pepper
Halve the eggs, which should have beautiful, soft, unctuous, sunshine yellow yolks and arrange over the glossy asparagus spears.

Serve immediately with lashings of love … xoxo …

Friday 3 June 2011

Apologies............

Dear all,

I haven't forgotten about you all....please accept my profuse apologies for my lengthy absence, however, Alex and I have been super busy, travelling abroad, and also packing up our old home, and moving to a new home.

We are living in boxes as we await the much anticipated arrival of furniture!

Happily though, we have finally have our internet up and running, so at least I can now start posting again on Diamonds & Dauphinoise...

Summer is well and truly on its way to us here in London, and I for one am extremely excited, not least because Alex and I now have outdoor space in our new property.  A patio at the front and back, and also a 3 acre landscaped, communal garden yippee! 

We simply cannot wait to fire up the BBQ, and dig out the picnic blanket, and enjoy al fresco dining with our friends and family.  So watch out for summer recipes in the near future.

Speak soon...keep cooking with love…

Lots of  love,
Helen
xoxo

Monday 9 May 2011

Tomato and basil bruschetta

Bruschetta is a favourite of Alex's and he orders it everywhere.  One of our favourite  London restaurants is Scalini in Knightsbridge, where they always serve bruschetta alongside olives and bread sticks.  In Scalini they don't use basil, but I like to use basil when I make this at home.

This literally takes minutes, just as long as it takes you to chop tomatoes, basil and toast some bread.

Here's what you need:

1 small ciabatta loaf
handful of ripe tomatoes
1 cloves garlic, crushed or finely chopped
small handful of finely snipped chives
1 handful of fresh basil, chopped
extra virgin olive oil, for drizzling
1 cloves garlic, cut in half for rubbing

Roughly chop the tomatoes and tip them into a bowl with their juices. Mix in the crushed garlic, chopped basil and a generous glug of olive oil. Set aside to allow the tomatoes to marinate for a couple of minutes.

Then heat a griddle pan over a medium-high heat then add the sliced ciabatta and toast lightly on both sides, I like the griddle marks across the bread.

Drizzle extra virigin olive oil over the toasted ciabatta slice, then rub with the halved garlic cloves.

Then spoon the tomato mixture onto the warm ciabata.

Serve immediately with parma ham, bresaola, buffala mozzarella....

..and of course with love....xoxo

Thursday 5 May 2011

Kitchen Fantasies 2

My fiance and I spent a month in his hometown in Cyprus over the Christmas and New Year period.  During this time we stayed with his parents, my soon-to-be-in-laws, and unfortunately I fell prey to a nasty dose of flu and was stuck at home in bed for a week!  Now during my time alone, my BlackBery and E! channel became my best friends as this was one of only two English speaking channels in the house.

Much to Alex's chagrin, I got completely and utterly hooked on 'Keeping up with the Kardashians' ... to this day my apparent obsession with all things Kardashian has reached fever pitch.

Recently in the show, Kim Kardashian moved into a beautiful new house and I absolutely fell in love with it, not least because of this elegant, beautiful and calming kitchen:

I adore the dark hardwood floors in stark contrast to the perfect white wooden cabinetry, and cream granite worktops.

I love how the windows open completely, giving a full uninterupted view to the garden and swimming pool.

The bar stools, fireplace, and snug seating area on the other side of the fireplace, ensure that this kitchen really is the heart of the home.

Having watched practically every 'Keeping up with the Kardashians' episode there is, it is not difficult to come to the conclusion that Kim isn't the traditional domestic goddess, however, I'm sure every meal she does serve there (home made or not), is nonetheless ...
... served with love ... xoxo

Tuesday 3 May 2011

Jules & Sharpie Hot Pepper Jelly

My dear friend Andrea really is a fabulous hostess … at one dinner party she hosted, Andrea served this fabulously spicy jelly with her charcuterie and cheeses board … one mouthful and I was hooked.  I haven’t found where to buy this in my local Waitrose, delicatessen, Sainsbury’s, or Tesco yet … so Andrea kindly got me a jar from a little place in Surrey. 

I like to serve this chilli jam, just as Andrea did with cold meats, pates, cheeses, cornichons, baby pickled onions and warm crusty bread – it has been a welcome addition to our deli board, and I’m positive that your family and friends will be happy to tuck in also.

On a recent visit to London, George, my soon-to-be-father-in-law fancied a snack and came across this jelly in the fridge.  Unfortunately for George, he mistakenly thought the picture of the birds eye chilli on the cover was a cherry, and happily smothered the spicy jelly liberally all over his bread … it was very amusing to say the least … ah well, at least he lived to tell the tale …

Don't forget to use this with caution if you're of a more sensitive constitution....
....serve with love...xoxo

Monday 2 May 2011

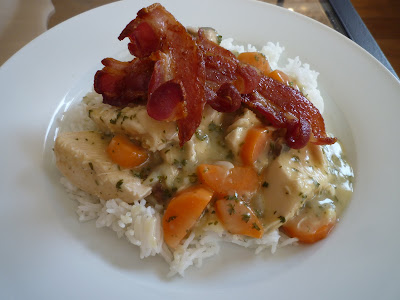
Chicken Fricassée & Rice

Chicken fricassée was a typical Sunday night supper in the Morrison household after having a roast chicken.  My father used to make chicken fricassée and serve it in jumbo vol-au-vonts, sounds old fashioned, but it was extremely comforting.

Unfortunately, my local Waitrose didn't have any sort of vol-au-vent, perhaps they're a little passé these days, but it didn't put me off making this dish, and it's still perfectly yummy with steamed rice - not to mention more healthy!

My father would make a béchamel sauce and then add all the ingredients; however, I like to use homemade chicken stock instead of milk, as I think it increases the flavour ten fold.  I also like to add a little tarragon

Here’s what I used for the two of us:

Homemade chicken stock (made using the bones and carcass of a whole chicken boiled with carrots + celery + bay leaves + parsley stalks + whole black peppercorns)

1 large chicken breast on the bone with skin (you could easily use 2 chicken legs, or 4 chicken thighs if you preferred)
1 carrot, whole
4 shallots, peeled kept whole
handful of chestnut mushrooms, sliced
bouquet garni
50g margarine/butter
50g plain flour
1 free-range egg yolk
juice of ½ lemon
8 slices of grilled streaky bacon
Parsley, finely chopped
Tarragon, finely chopped

Put the chicken breast, carrots, shallots and bay in a large pan with homemade chicken stock. Add the bouquet garni.

Bring slowly to the boil and simmer gently for 20/30 minutes until the chicken is cooked – obviously this will depend on the sizes of chicken pieces you use.

When the chicken is cooked, remove from the pot and keep warm.

Strain the stock, reserving the carrots and shallots and stock separately.

Melt the butter, stir in the flour and cook for 2 to 3 minutes.  Remove from the heat and gradually add the stock.

Bring to the boil and cook until the sauce thickens, stirring constantly.  Add the chopped mushrooms and cook for a couple of minutes. 

Remove the skin from the chicken, carve the meat and cut it into rough pieces.  I think if the cubes look too perfect – it looks a microwave meal.

Add the meat and sliced shallots and sliced carrots; remove from the heat.

Beat together the egg yolk and lemon juice, then add a little of the left over stock and blend well.  Keep adding until the mixture is hot.

Pour the mixture back into the pan and heat through without boiling.

Add the chopped parsley and chopped tarragon.  Check for seasoning now, adding salt and pepper if necessary. 

Transfer the fricassée to a warmed serving dish and garnish with the grilled bacon.

Serve with simply boiled rice…
…and of course with love…xoxo

Wednesday 13 April 2011

Anna's Roast Chicken

My dear friend Anna, is a super busy full time TV executive and full time yummy mummy.  I admire her strength and diligence day in and day out, as I watch her juggle her career, with motherhood as well as running a home.

Darling Anna cooked myself and our friends this roast chicken one Christmas, (whilst holding a baby), and ever since then I often cook it in my own household, and everyone knows it fondly as “Anna’s Roast Chicken”.  We love it’s tasty, crispy skin!

Here’s what to use:

1 medium sized organic free range corn fed chicken
1 head of garlic
1 chopped red chilli, seeds included
2 lemons, quartered
1 glass of dry white wine
A few sprigs of fresh rosemary
A handful of green olives olive chopped in half
A few good slug of light soy sauce
A good slug of extra virgin olive oil

Marinade the chicken in the above for as long as possible, preferably overnight. 

Heat your oven up full whack.

When you’re ready to cook the bird, make sure you take it out of the fridge about 15 minutes before cooking time to warm up a little.

As I said to you before, place the bird breast down in the roasting pan.  Scatter the lemons, chillies, olives, herbs and garlic around the bird.  You may think that they have done their job during the marinating time, however, they continue to flavour the pan juices when the bird is cooking.

Now do not let anything lie on the skin, as it will leave an unsightly white mark on the skin when it eventually falls off - just like our summer tans, we want a lovely, evenly coloured golden skin.

As soon as you put the chicken in, turn the temperature down to 200 degrees Celsius.

After half and hour, turn the bird over so the breast is on the top, and baste the breast, legs and wings liberally.

The bird should only take about another 60 or 70 minutes, so baste it generously every half and hour…..it really really does make all the difference.

Remember to leave the bird to rest for 15 minutes covered in foil, to allow the bird to rest, which makes it become even juicier.  Carve the bird, and pour the juices over the breast meat.  The meat is so juicy it doesn't even need gravy!

Serve with roast potatoes, and a medley of steamed greens….
….and of course with love…xoxo

Tuesday 12 April 2011

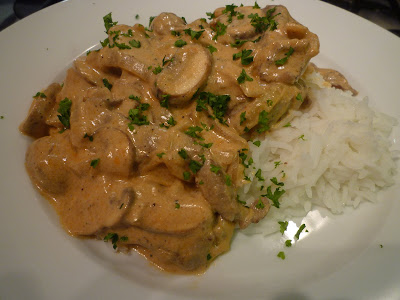
Beef Stroganoff

This is another old fashioned, rather 70’s dish, which although sounds kitsch is a true classic.  It originates from 19th Century Russia and is traditionally served with shoestring fries.

This is a super speedy supper dish, and is rich, velvety and delicious.  Both Alex and my Daddy love this dish, so I certainly hope the men in your life love it also…..

It is very important to use fillet steak as it is cooked very quickly, so you need a lean and tender piece of meat.  As a general rule the leaner the meat, the quicker you should cook it on a high heat; and the fattier the meat, the more slowly and gently you should cook it.

Here’s what I used for the two of us:

1 medium sized fillet steak
1 medium onion, sliced thinly
1 small packet of chestnut mushrooms, cleaned and sliced thinly
2 tsp Dijon mustard
1 tsp tomato puree
1 tsp of corn flour
1 small pot of ½ fat crème fraiche
Juice of ½ a lemon
½ a mug of rice

First of all put the rice in a pot, with double the amount of cold water.  Add a pinch of salt, and bring to the boil.  When it is boiling move to the smallest ring on the hob, and turn to the lowest setting.  Put the timer on for 20 minutes, and go away and relax.

Thinly slice the steak, and flash fry for a matter of seconds - you only want to sear the meat.  Take out of the pan, and keep warm.

When you come back fry the onions and mushrooms gently.  Traditionally butter is used, but I prefer to use olive oil.

Add the mustard and tomato puree, and fry off.  Then sprinkle with flour, and then add the crème fraiche, lemon juice.  Taste for seasoning, add salt and pepper if necessary. 

Add steak to sauce and warm through.

Serve with rice and sprinkling of parsley….
…..and of course with love…xoxo

Wednesday 6 April 2011

Spicy Sausage Pasta

The other night I had to run out and meet a girlfriend, and Alex didn’t fancy pizza, oriental, or any of the usual take-away options.  So I whipped up this little dish, and it only took as long as the pasta needed to cook.

Here’s what I used:

3 small uncooked chorizo sausages
1 red onion, thinly sliced
1 clove of garlic, finely chopped
1 small tub of crème fraiche
1 small tin of chopped tomatoes
1 pinch of chilli flakes
1 tsp of hot paprika
Handful of chopped parsley
200g dried penne pasta

Boil a kettle and add to a pan, with a good pinch of salt and glug of olive oil.  Add the pasta, and cool until al dente, this should only take 11 minutes.

Meanwhile put a pan on the heat, cut the sausages into chunks and fry off.  Add the onion and the garlic, and allow to colour and caramelise for a couple of minutes.  Add the tomatoes, chilli flakes and paprika and bring to a rapid boil.  Then add the crème fraiche, bring to the boil, then simmer until thickened.

The pasta should be cooked al dente by now.  Drain, and add the pasta to the sauce, (Italians always insist on adding the pasta to the sauce, and not the other way around). 

Stir through the parsley, and serve with garlic bread….
…and of course with love…xoxo

Sunday 3 April 2011

Tricolore Salad

The salad received its name as it incorporates the same colours as the Italian flag, green, white and red.

This fresh tasty salad only takes a minute to prepare.  It shows off true Mediterranean beauty in it’s quality, freshness, and simplicity.  It is perfect for a lunch, or a light supper, or as part of a Mediterranean spread or meze, or even a dinner party starter.

We have all had tricolore salads that sometimes look the part, but definitely don’t taste the part.  It is very important to only use the freshest, best quality ingredients in this salad.  Smell the tomatoes individually and the basil leaves, they should smell juicy, pungent and delicious.

It is also important that you serve the tomatoes at room temperature, not straight out of the fridge.  Many organic tomato growers say that we shouldn’t even store tomatoes in the fridge at all.

Here’s what you need:

4 large firm juicy tomatoes
250g Mozzarella di Buffalo
1 bunch of fresh basil

Slice the tomatoes and lay on a plate, then add the sliced mozzarella, then the basil leaves.  Drizzle with extra virgin olive oil, and a few twists of black pepper.

Serve with warm crusty bread, perhaps some Parma or Iberico ham, which you can easily get from your delicatessen….and of course….
…with love….xoxo

Saturday 2 April 2011

Ham & Pea Soup

My father loved this soup and used to make it during the winter months.

We would always know that a split pea and ham soup was on its way when we saw the lentils soaking over night on the counter top.

Every Saturday Daddy and I would visit his favourite delicatessen in the nearest town, and amongst the usual cheeses and charcuterie, we always had hand carved off the bone ham.

Whenever my father fancied this soup, he would ask the deli to keep the ham bone for him.

This is a great soup to make in the morning before going out in the cold, as it happily sits on the hob for hours. I fondly remember the warm comforting delicious aroma of the ham soup bubbling away gently on the aga.

I wasn't able to obtain an entire bone, but was able to get a 1.5kg ham knuckle from my butcher.
Unfortunately, Alex didn't seem as excited as we were when he saw the lentils on our kitchen counter top!

Here's what I used:-
1.5kg knuckle of ham
500g green lentils
A couple of onions, chopped
A couple of carrots, chopped
A couple of sticks of celery, chopped
A handful of bay leaves
A handful of whole black peppercorns

Put everything in a very large pot, and cover with cold water.

Bring to the boil, and simmer gently for a couple of hours.

Remove the ham knuckle, and blend the soup, as I like it smooth.  Strip the meat off the bone and keep warm.  There will be more than enough ham for the soup servings, and I usually like to use the leftovers in a chicken, ham and mushroom pie.

Ladle the soup into bowls, adding nice chunks of the cooked ham....sprinkle with a little chopped parsley and snipped chives.

Serve with cheesy Irish wheaten bread crutons....

and of course....
.....with love...xoxo

Wednesday 30 March 2011

Koupes & Lemons

Koupes are traditional Cypriot mince pork meat croquettes encrusted in bulgar wheat, and shaped a lot like a lemon.  It is very similar to the Lebanese Kibbeh, (although these are made with minced lamb or beef, with the addition of pine nuts), and I like to think equally delicious.  Cypriots generally eat these as snacks for breakfast from a bakery, or as a midmorning or afternoon snack, and companies serve these daily in their canteens.

Now koupes are quite hard work, but you can make a batch of them, well in advance and just re-heat if you’re making them as part of a meze, or else you could freeze them for a rainy day.

The first couple of times I made koupes, it was a bit of a disaster!  I couldn’t understand what happened, I followed the recipe book meticulously, and still they turned out very badly.  My problem was getting the bulgar wheat paste smooth and malleable.  Eventually I found a solution.

Here’s what I used:

For the meat:
250g minced pork
1 clove of garlic finely chopped
1 small bunch of curly parsley, very finely chopped
1 onion, very finely chopped
1 tbsp of ground cinnamon
Pinch of salt + freshly ground black pepper

For the crust:
1 mug of bulgar wheat
1 ½ mugs of boiling water
2 tsp cinnamon
1 organic free range egg
Pinch of salt + freshly ground black pepper

Brown the onion, pork and chopped parsley.  Add the cinnamon and salt and pepper.  Taste and check for seasoning.  Leave the mince to cool.

Boil the kettle.  Add the boiling water to the bulgar wheat.  Leave the bulgar wheat to soak up all the water, this will only take 15 minutes or so.

When cooled, add the cinnamon, seasoning and the egg.  Mix thoroughly with your hands.  Put into a food processor and whizz up until it forms a relatively smooth paste.  If it’s too dry, add another egg.

By now the mince and bulgar wheat paste will have cooled enough to handle.

Wet your hands, as the paste will be very sticky.

Take a small lemon sized amount of paste in your hand, and shape into a more lemon-like shape.

Stick your little finger into one pointy end of your croquette and gently spread out leaving a hole big enough to fill with a couple of teaspoons of minced meat.

Gently pinch together the edges into another point.  If you don’t have enough in your croquette, then just take a little more paste from the bowl, and press onto your croquette.

Deep fry the croquettes in vegetable, sunflower or corn oil for approximately 8 minutes until a deep golden brown.

Serve piping hot with lemon wedges…..
…..and of course with love….xoxo

NB: if you don’t eat pork, you could easily use lamb mince or beef mince, or turkey mince or chicken mince.  If you are vegetarian, you could also use mushrooms.  If you would like to use the latter turkey, chicken or mushrooms, add allspice instead of cinnamon and a crumbled stock cube for added depth of flavour.

Tuesday 29 March 2011

Tarragon & Dijon Roasted Chicken

A good old fashioned roast chicken is a beautiful thing.  There are many ways to roast a chicken, and this is one of my favourites.  This is super simple and easy to prepare, and doesn’t need much attending to, as it only needs be basted every half an hour.

Here’s what I used:

1 organic free range corn fed chicken
2 tbsp olive oil
2 heaped tsp Dijon mustard
2 tbsp of dried tarragon
Pinch of sea salt
4 good twists of black pepper

Pre-heat your oven to 200 degrees celcius.

Mix all ingredients together in a small bowl, using a small whisk or fork.  The oil and mustard will thicken nicely, which is exactly what we want.

Coat the entire chicken with the mustardy mixture, inside and out, and even under the skin on the breast.

A Moroccan lady once imparted some pure wisdom onto me, and told me that it is important to start cooking the bird breast-side down in the roasting pan this way as it helps to keep the breast meat juicy.  I suppose it makes perfect sense as the juices generally run downwards.  I have cooked roast chicken in this manner ever since, and it has never failed to be succulent and juicy.  This is very important, as there is nothing worse than dry chicken.

After 30 minutes turn the bird over, and baste liberally with the pan juices.

After another 30 minutes baste the bird liberally again.

In another 30 minutes the bird should be cooked.  Check by sticking a skewer into the fattest part of the leg, and check that the juices run clear.

Cover the bird in foil to keep it warm, and leave it to rest for 10 minutes.

I like to serve this with braised pointed spring cabbage

and perfect roast potatoes…..

………..and of course with love….xoxo

Sunday 27 March 2011

Halloumi & Pancetta with Mango Chutney

Halloumi is a semi soft Cypriot cheese made from goats or ewes milk.  It is deliciously salty and has a higher than normal melting point, so it can be grilled, BBQ’d or fried and it will not fall apart.

Cypriots will eat fresh halloumi at breakfast with lountza (cured loin of pork sliced thinly) and also with fruit.  Here in the UK it isn’t as fresh as in Cyprus, so I usually dry fry slices until crispy and golden brown on the outside, as part of a meze.  It is lovely with pomegranate or water melon.  Alex loves cooked halloumi in a baguette with thinly sliced lountza and salad.

On a recent trip to Cyprus dear friends of ours Mix and Manni took us to a wonderful restaurant in Limassol called Ta Piatakia, headed up by a chap called Roddy Damalis who specialises in contemporary Cypriot cuisine (www.roddydamalis.com/about-piatakia).  Ta Piatakia means ‘little plates’ and his restaurant is a wonderful take on the Spanish tapas bar.
Every time Alex and I go there, we leave very satisfied customers indeed.  Mr Damalis does a wonderful job of tweaking traditional village dishes, and bringing them straight into the noughties, all set within a fabulous, trendy little restaurant.  Mr Damalis is an inspiration.

Two signature dishes were the baked feta parcel drizzled in honey, and the caramel and chocolate cheesecake.....both are quite simply to die for…..
baked feta parcel

caramel and chocolate cheesecake
One very memorable and simple dish that we had was halloumi wrapped in bacon served with mango chutney.  I have done a few re-enactments of this dish as an hors d'œuvre before a dinner party, and it was gobbled up instantly!  I have changed it slightly, and used super thinly sliced pancetta as I found it less fatty than bacon, and thought it had a more refined taste.  I have also speared the halloumi and pancetta with rosemary for added depth of flavour. 

Here’s what I used:

1 packet of halloumi, cut into chunks
1 packet of thinly sliced smoked pancetta
Fresh rosemary
1/2 a jar of mango chutney

Cut the halloumi into chunks, wrap in the pancetta and spear with rosemary.  If you don’t have rosemary, you can easily just use cocktail sticks or skewers. 

Cook under a pre-heated grill until the pancetta is sizzling and the halloumi is golden brown and delicious.  Drain on kitchen roll, dabbing any excess fat. 

Serve with mango chutney….
…and of course with love….xoxo

Soupa Rizi Avgolemono

As I mentioned a few days ago, Alex and I were feeling rather under the weather.  Now we all know that when a man is exposed to any form of the treacherous Common Cold, they fall prey to a gravely serious illness widely known as “Man Flu”.

To date, (unfortunately for us), no complete cure has been found for the vicious and dilapidating “Man Flu”, and we must pander to our poor, injured little soldiers as they hover around death’s door. 

In times of such affliction and convalescence, a man will need his wife or mother, or preferably both, to be on 24 hour duty to mollycoddle him back into the land of the living.

Unfortunately for me Alex’s mother wasn’t to hand, but I did remember how to make the Cypriot version of the wondrous chicken soup.

I usually make my own spicy Asian inspired chicken soup, but Avgolemoni is perfect for colds, and for Alex this soup embodies TLC in a bowl.  Avgolemoni is a lovely silky soup, full of vitamin C, protein, and rice and it is very comforting indeed.  Usually for an entire family, you would use a whole chicken, however, I didn’t have one to hand so I defrosted some chicken legs that I had in the freezer for a rainy day.

I have spoken to several Cypriot women about the best way to make Avgolemoni, taken notes, and this is my version of the Cypriot classic.

Here’s what I used:

4 organic free range chicken legs
1 small carrot + 2 bay leaves + 1 small onion, peeled + pinch of whole black peppercorns
(as if you were making a normal chicken stock)
½ a mug of basmati rice, starch rinsed off
2 organic free range eggs
3 lemons
Sea salt and black pepper

Put the chicken legs, carrot, bay, onion, and peppercorns in a large pot, and cover entirely with cold water.

Bring to the boil, then turn down the heat to medium so that it doesn’t bubble and overflow whilst it simmers away.

15 minutes later the chicken will be cooked, so remove the chicken and vegetables.

Now skim the scum off of the surface of the stock.

Take the skin off the chicken and discard.  It was important to keep the skin on during cooking, as it keeps the flesh moist, but we definitely don’t want to eat it now.

Take the meat off the bones, and place the bones back into the stock.  Put the rice into the stock and cook until just under done.  This should only take around 15 minutes.

In a bowl whisk the juice of two lemons together with two eggs.  Add a little of the chicken stock into this eggy mixture, whisking continuously.  Add ladle by ladle until the eggy mixture is warm.

Remove the bones from the stock pot.  Add the eggy mixture to the soup whisking continuously.

You will see the soup turn opaque to a creamy yellow colour.  This is exactly what you want. 

Check for seasoning now, add salt and pepper as necessary.  Simmer the soup for a few minutes, but do not boil.

Serve with the cooked chicken, extra wedges of lemon, and some warm crusty bread….
…….and of course with love….xoxo……..

Tuesday 22 March 2011

Flash Fried Turkey Stir Fry

Alex and I both have stinky colds, so tonight for supper, I really wanted to prepare something super quick, nutritious, and spicy to get the sinuses moving.

Here’s what I used:

1 Turkey breast (I like turkey as it’s even more lean than chicken)
2 tsp of sesame oil
2 red chillies, finely chopped
1 thumb sized piece of ginger, grated
3 cloves of garlic, finely chopped
2 tbsp of light soy
2 tbsp of Shaoxing wine
1 tbsp sweet chilli sauce
1 yellow pepper
1 small packet of baby sweetcorn
spring onions cut on a slant
broccoli florets
fresh coriander
1 tsp corn flour + 4 tsp of water
½ mug of Basmati rice

The stir-fry takes only a matter of minutes, but the rice will take approximately 25 minutes.

After living in Japan, my mother always liked to boil and steam rice, like the Japanese, and this is the only way that I ever cook rice.

I find that ½ a mug of rice is more than sufficient for 2 people.  It is important that you cover the rice with exactly double the amount of water, so in this instance 1 full cup.  Add a pinch of salt, cover the pot, and bring to the boil.  As soon as it boils, move the pot to the smallest hob ring, and turn down the heat as low as possible.

Now you can make a cup of tea, and go away and come back in 20 minutes.

Check the rice, and you will see it has expanded and the pockets of steam will be running from top to bottom.

Get all your vegetables ready now, and slice the turkey.

Heat your wok until it is smoking.  Add the sesame oil.  Then add the Chinese holy trinity that is chilli, ginger and garlic which is a prevalent combination of sautéed ingredients, typically used in the spicier regional cuisines of China.

Add the turkey, which will only take a minute as it is sliced thinly. 

Then add the vegetables which takes the longest time to cook, so the sweet corn and the broccoli.

Add the light soy, the Shaoxing wine, and the sweet chilli sauce.

After a minute add the spring onions and the sliced pepper.

Now mix the water and the corn flour to make corn starch, and drizzle a few teaspoons over the stir-fry and toss.  This will thicken the sauce and make it wonderfully glossy – without all the MSG that you would get in a ready made Chinese stir-fry sauce / meal.

Add some fresh coriander. 

Serve with the steamed rice and extra fresh coriander and extra freshly chopped chillies……….

………..and of course with love, especially when under the weather…….xoxo

Sunday 20 March 2011

A Lovely Little Crayfish Cocktail

My father used to make prawn cocktail served in half an avocado as a treat on weekends.  He taught me how to make Marie Rose sauce from scratch, and contrary to common belief it does not involve ketchup and mayonnaise! 

Daddy used single cream, although I use half fat single cream, and quite happily nobody can tell the difference.  I also like to use crayfish tails as an alternative to prawns – I think they’re slightly meatier, like mini lobster tails if you will, and I think the twist brings the 70’s classic up to date.

This salad is super super easy, takes a matter of minutes, and if that wasn't appealing enough, it is also man and child friendly.

Here’s what I used:

Little gem lettuce
Ripe avocado
Cucumber
Lemons
180g pot of cooked crayfish tails
170ml (the small pot on the supermarket shelves) of half fat single cream
1 tbsp of tomato puree
5 dashes of Worcestershire sauce
4 dashes of Tabasco
Juice of half a lemon
A few twists of black pepper and a pinch of salt

Mix the wet ingredients together in a small bowl with a mini whisk or a fork, until combined.  Have a little taste, if you would like it a little spicier add more Tabasco or more Worcestershire sauce.  If it needs more lemon juice add more lemon juice, the same for seasoning.  The beauty of making your own sauce is you can make it to YOUR own taste.

Do not over whisk the sauce, as a lighter sauce is much more appealing than a thick, gloopy sauce like its lesser mayonnaise and ketchup counterparts.

Now assemble the salad, remembering that the bright colours are what make this dish look so appetising.  I like the greens at the bottom and the bright jewel like colours of the crayfish scattered over the top, with the Marie Rose sauce drizzled over.  Not too much now – remember you can always add, but you can never take away.

Serve with fresh granary bread, a wedge of lemon.....

and of course….with love….xoxox